How to Replace an Immersion Heater
An immersion heater is the electric backup for your hot water. When the boiler's out, the immersion is what keeps hot water flowing. When the immersion itself fails, you've got no fallback. Replacing a top-entry immersion heater is straightforward plumbing — the tricky part is getting the old one out. Here's the full process.
Electrical work involved
Replacing an immersion heater involves disconnecting and reconnecting a mains electrical supply. If you're not confident working with electrics, get a qualified plumber or electrician to do this job. The plumbing is simple — the electrical isolation and reconnection are where the safety risk is.
Isolate the Electrics and Water
Electrics first
Turn off the immersion heater at the wall switch (usually a double-pole switch with a neon indicator near the cylinder). Then go to the consumer unit and switch off the dedicated immersion heater circuit breaker. Use a voltage tester on the immersion terminals to confirm the supply is dead before touching any wires.
Water supply
Find the cold feed valve to the hot water cylinder. It's usually a gate valve or isolation valve on the cold pipe entering the bottom of the cylinder. Turn it off. Then open all the hot taps in the house to drain the expansion pipe back to the cold tank in the loft. The taps will run for a few seconds then stop — that's the water above the cylinder level draining out.
Loosen the immersion while the tank is still full
This is a trick that makes the job much easier. Before you drain any water, try cracking the immersion heater loose while the cylinder is full. The weight of the water stabilises the copper cylinder and stops it flexing. Hot water cylinders are made from thin copper sheet — if you apply heavy force to the immersion boss on an empty tank, you can distort or even rip the cylinder wall. Crack it loose first, then drain.
Partially Drain the Cylinder
You don't need to empty the whole cylinder for a top-entry immersion heater. You just need the water level below the immersion boss — typically draining 5–10 litres is enough.
- Connect a hose to the drain valve at the bottom of the cylinder. Run the hose to a bath, outside, or into a bucket.
- Open the drain valve. Water should flow out by gravity.
- Crack the nut on the hot outlet at the top of the cylinder to let air in. This breaks the vacuum and lets the water drain freely.
- Drain enough so that when you look at the cylinder, the water level is comfortably below the immersion boss. For a top-entry immersion, 5–10 litres is usually sufficient.
- Close the drain valve but leave the hose connected — you might need it if you've misjudged the level.
Remove the Old Immersion Heater
This is the hardest part of the whole job. An immersion heater that's been in place for 10–20 years, repeatedly heated and cooled, can be extremely tight. The thread seizes with limescale and corrosion.
Disconnect the wires
Remove the terminal cover from the top of the immersion. Take a photo of the wire positions before disconnecting. Loosen the terminal screws and remove the live, neutral, and earth wires. Loosen the cable clamp and free the cable.
Undo the immersion
You need an immersion heater spanner — a large flat spanner that fits over the hexagonal boss. If a standard immersion spanner won't shift it, try:
- Stilsons (pipe wrench) — more purchase than a flat spanner. Grip the hexagonal flats and apply steady, firm pressure anti-clockwise.
- Heat. A blowtorch applied gently around the brass boss can expand the metal enough to break the seal. Don't go mad — there's a rubber gasket and an insulated cylinder nearby.
- Shock. Tap around the boss with a hammer to shock the corrosion loose, then try the spanner again. Light taps, not full swings.
Don't force it on an empty tank
If the tank is empty and the immersion still won't budge, refill the tank before applying more force. An empty copper cylinder has no internal support. Too much torque on a seized immersion can collapse or tear the cylinder wall around the boss. Fill it, then try again. The water pressure supports the copper from inside.
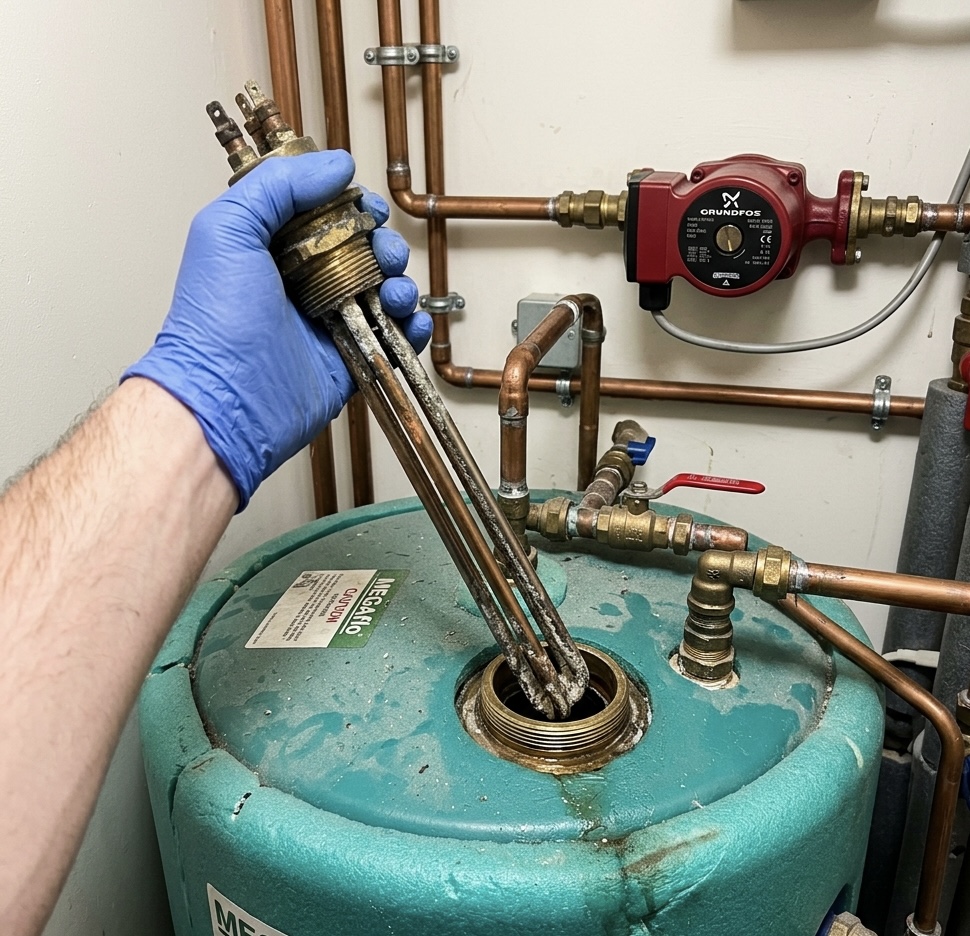
Once it's loose, unscrew it by hand and lift the old element out. It'll be long — the heating element extends most of the way down inside the cylinder. Have a towel ready for drips.
Fit the New Immersion Heater
Prepare the sealing face
Before the new immersion goes in, clean the sealing face on the cylinder boss. Use a flat file to remove any old gasket material, limescale, or corrosion. You want a smooth, flat, shiny copper surface for the new gasket to seal against. Take your time here — a poor sealing face means a slow leak that you won't spot for hours.
Fit the gasket and element
- The new immersion heater should come with a new rubber gasket (O-ring). If it doesn't, buy one separately — don't reuse the old gasket.
- Apply a thin smear of jointing compound to both sides of the gasket. This helps it bed in and provides extra sealing insurance.
- Optionally, wrap a few turns of PTFE tape around the thread. Belt and braces — the gasket does the sealing, but PTFE gives extra protection.
- Feed the new element into the cylinder carefully. Don't force it — it needs to slide in without catching on the coil or the cylinder wall.
- Start the thread by hand. If it cross-threads, you'll damage the boss and create a leak that can't be sealed. Hand-tight first, then snug up with the immersion spanner.
- Don't overtighten. Firm and snug is enough. You can always nip it up a fraction more if it drips once you refill.
Refill and Check for Leaks
- Close the drain valve.
- Open the cold feed valve to refill the cylinder.
- Close the hot outlet nut you cracked open earlier.
- Close all the hot taps you opened. As the cylinder fills, air will push out through the hot taps — leave one open until water flows from it, then close it.
- Watch the immersion boss carefully as the water level rises past it. Any drips? If so, nip the immersion up a quarter-turn and check again.
Cut back the foam insulation
If the cylinder has foam insulation around the immersion boss, trim it back a couple of inches so you can see the sealing face clearly. Foam can hide a slow drip for hours. Once you're confident there are no leaks, you can push the foam back into place. Finding the leak now is much easier than finding water damage later.
Leave it for 20–30 minutes with the water on but the electrics off. Go have a cup of tea. Come back and check the boss again. Some leaks only appear once the gasket has settled under pressure. If it's bone dry after half an hour, you're good.
Wire Up and Test
Set the thermostat
Before wiring, set the thermostat on the new immersion to 55–60°C. This is the recommended range — hot enough to kill legionella bacteria (which can grow in water stored below 50°C) but not so hot that it scalds or wastes energy. Most new immersions come with the thermostat pre-set, but check and adjust if needed.
Wire the terminals
Follow the manufacturer's instructions. The standard arrangement on most UK immersion heaters:
- Earth (green/yellow) — to the earth terminal
- Neutral (blue) — to the neutral terminal
- Live (brown) — to the live terminal, which is switched through the thermostat
Tighten the terminal screws firmly. Secure the cable in the clamp so no strain is on the terminals. Fit the terminal cover.
Test
- Switch on at the consumer unit.
- Switch on at the immersion switch.
- If the water in the cylinder is cool, you should hear a gentle hiss as the element starts heating. The neon indicator on the switch should be lit.
- Check back in an hour — the hot taps should be running warm. Full heat-up of a typical 120-litre cylinder takes 1–2 hours on a 3kW immersion.