How to Fix a Leaking Radiator Valve
A radiator valve can leak from four different places, and each one has a different fix. Before you start tightening random nuts, it's worth understanding which part is actually leaking — otherwise you'll tighten the wrong thing and the drip will still be there tomorrow. This guide covers all four leak points and how to fix each one.
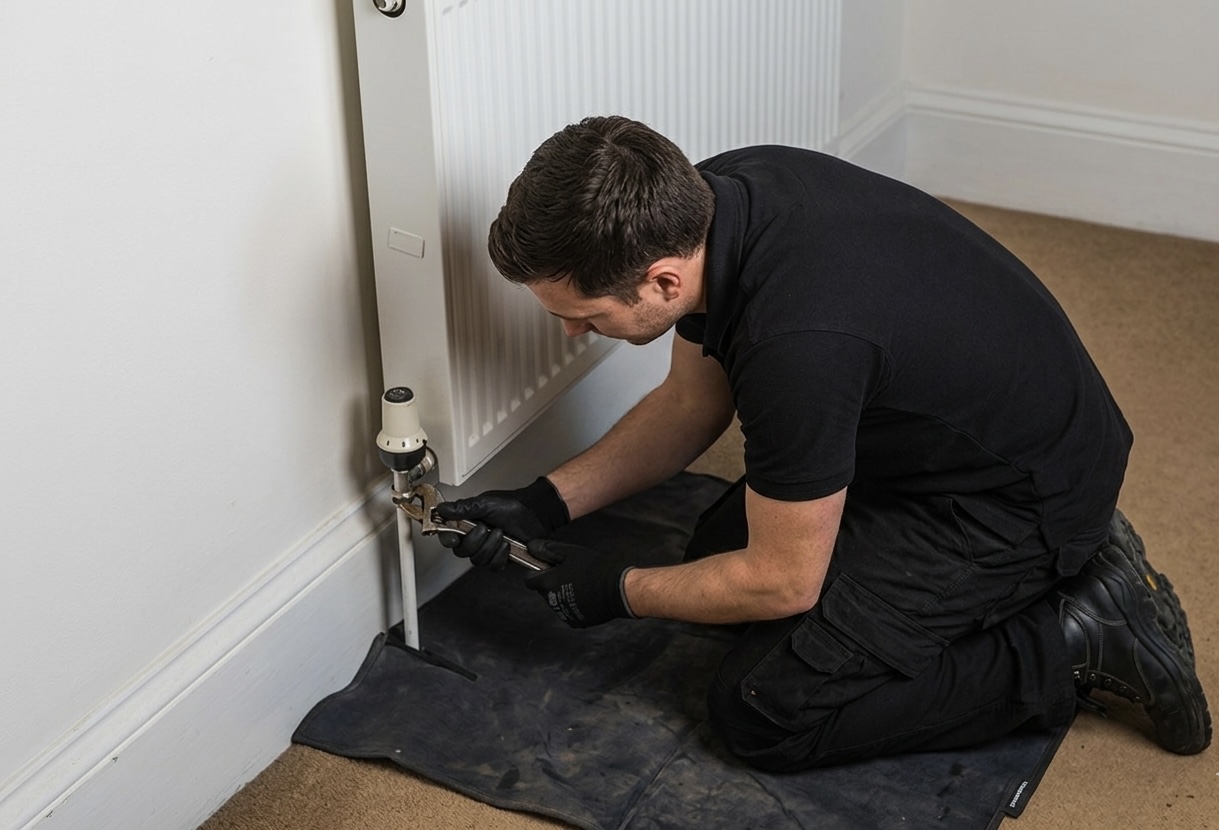
Finding the Leak
Radiator valves have multiple connections close together, and water runs downhill. A leak from the top of the valve will drip down and make it look like the bottom is leaking. Before you start taking anything apart, dry the entire valve assembly with a cloth, then wrap strips of dry tissue around each connection point. Wait ten minutes with the heating on. The tissue that's wet tells you exactly where the leak is.
The four leak points on a radiator valve
- Point 1 — Insert thread: where the threaded insert screws into the radiator body (top connection)
- Point 2 — Body olive: the compression nut where the valve body connects to the radiator insert
- Point 3 — Supply pipe olive: the compression nut where the copper supply pipe enters the bottom of the valve
- Point 4 — Gland packing: the small nut under the valve head/TRV cap, around the spindle
Points 1 and 2 are on the dead side — you can isolate them by closing both radiator valves. Point 3 is on the live side — it's connected to the pressurised system and can't be isolated without draining down. Point 4 can usually be done with the system running. This distinction matters — read the section on live side vs dead side before starting on point 3.
Leak 1: The Insert Thread
The radiator insert is a brass fitting that screws into the radiator with a half-inch male thread. The seal is made with PTFE tape, hemp, or thread sealant (like Loctite 55) applied to the thread. Over time, the sealant can dry out, crack, or get displaced by thermal expansion, and the joint starts weeping.
How to fix it
- Close both radiator valves — the TRV (or lockshield) at one end and the lockshield (or TRV) at the other. Turn them fully clockwise.
- Check the valves are holding. Open the bleed valve at the top of the radiator with a bleed key. If water stops flowing quickly, the valves are holding. Close the bleed valve.
- Place a towel and a small tray under the valve to catch drips.
- Hold the valve body with grips and undo the compression nut that connects the valve body to the radiator insert. Ease it back to expose the insert thread.
- Unscrew the insert a few turns using an adjustable spanner on the hex. You need to expose four or five threads — you don't need to remove the insert completely, and leaving it partially in keeps any remaining water in the radiator.
- Clean off the old sealant from the exposed threads.
- Wrap fresh PTFE tape around the threads. Wrap in the direction that tightening will pull the tape tighter (clockwise when looking at the end of the thread). 8–10 wraps is plenty.
- Screw the insert back in, tighten the compression nut back up, open both valves, and check for leaks.
Leak 2: The Body Olive
The valve body connects to the radiator insert with a compression fitting — a nut and olive. If this olive isn't sealing, water will weep from the nut. This is also a dead-side repair, so you can isolate the radiator first.
How to fix it
- Close both radiator valves and bleed to check they're holding (same as leak 1).
- Hold the valve body with grips and undo the compression nut connecting the body to the insert.
- Ease the valve body back to expose the olive.
- Wrap PTFE tape around the olive — 5 to 7 turns, clockwise direction. Or apply a thin smear of jointing compound.
- Push the valve body back on and retighten the nut. Don't overtighten — firm and snug.
- Open both valves and check.
For a more detailed guide on working with olives and compression fittings, see our compression fitting repair guide.
Leak 3: The Supply Pipe Olive
This is the nut at the bottom of the valve where the copper supply pipe enters. This is a live-side repair — the pipe is connected to the rest of the heating system, under pressure, and you can't isolate it with the radiator valves.
This one carries risk
If you undo this nut and can't get it back together quickly, you'll have pressurised hot water pouring out until you drain the system. If you're not confident working fast with wet, hot pipework, this is the one to call a plumber for. If you do attempt it, read the full process below and have everything prepared before you touch the nut.
Try the easy fix first
Before undoing anything, try simply tightening the existing nut. Hold the valve body with grips and give the bottom nut a quarter-turn with a spanner. Wipe it dry with tissue and wait. If the drip stops, you're done.
If tightening doesn't work
- Prepare the area. Lay out towels, place a paint tray or shallow container directly under the valve, and have a bucket nearby. Have a strip of PTFE tape torn off and ready to wrap.
- Hold the valve body with grips and undo the bottom nut. Water will start coming out — this is expected. Work quickly but calmly.
- Ease the valve body up slightly to expose the olive. Do not lift the valve off the pipe entirely — if you do, you'll have an open pipe spraying water.
- Wrap PTFE tape around the olive as fast as you can — 5 to 7 turns.
- Push the valve back down and retighten the nut immediately.
- Wipe dry and check for leaks.
If you've lost a significant amount of water and you're on a pressurised system, check the boiler pressure gauge and top up via the filling loop if it's dropped below 1 bar.
Leak 4: The Gland Packing
The gland is the small nut directly under the valve head (or TRV cap), surrounding the spindle that moves up and down when you turn the valve. Inside is a rubber O-ring or packing material that seals around the spindle. Over time, this dries out, compresses, or deteriorates, and water seeps out around the spindle.
This is the most common radiator valve leak and usually the easiest to fix. You can often do it with the system running.
Quick fix: tighten the gland nut
- Remove the valve head or TRV cap. Screw-on types just unscrew. Danfoss-style TRVs have a plastic clip you pop out, then twist and lift. Push-fit heads pull straight off.
- You'll see the gland nut — a small hexagonal nut around the spindle.
- Give it a quarter-turn clockwise with a small spanner or adjustables. Don't go mad — overtightening makes the valve stiff to turn.
- Wipe dry and check. If it stops dripping, refit the head and you're done.
If tightening doesn't work: repack the gland
- Close the valve fully (turn it clockwise until it stops).
- Remove the valve head/TRV cap.
- Undo and remove the gland nut completely. You might see a small rubber olive or old packing material inside.
- If the rubber olive is visible and looks compressed or damaged, replace it if you have one. Plumbing suppliers sell assorted packs of gland olives for a couple of pounds.
- If you don't have a replacement olive, wrap PTFE tape around the spindle where the gland sits. Four or five wraps, wound tightly. Use a small screwdriver to tuck the tape down into the gland cavity.
- Refit the gland nut and tighten — firm, not forced.
- Open the valve back up, refit the head, and check for leaks.
TRV glands leak more often
Thermostatic radiator valves have spindles that move constantly as the room temperature changes. This constant movement wears the gland packing faster than a manual valve that stays in one position. If your TRV gland keeps leaking even after repacking, the valve body is worn and needs replacing — repacking won't hold long-term on a worn spindle.
Important: Live Side vs Dead Side
This is the critical distinction that catches people out:
- Dead side (leaks 1, 2, and 4) — these connections are between the two radiator valves. When you close both valves, this section is isolated from the rest of the system. You can work on it safely without draining anything. Small amounts of residual water in the radiator itself — nothing dramatic.
- Live side (leak 3) — the supply pipe connection is below the valve, on the system side. It's under full system pressure at all times. You cannot isolate it without draining the heating system or being very quick with the repair.
Always start with the dead-side checks. If the leak is on the live side and a simple nip-up doesn't fix it, seriously consider whether you want to attempt the PTFE wrap method or whether it's simpler to get a plumber to drain down and do it properly. A controlled drain-down takes 30 minutes and means no risk of flooding. The fast method saves time but has no margin for error.
If you do drain the system for a live-side repair, always add inhibitor when you refill. Fresh water without inhibitor accelerates corrosion and creates the hydrogen gas that causes airlocks and boiler pressure drops.