How to Fit an Outside Tap
An outside tap is one of those jobs that sounds complicated but is actually straightforward once you understand the components. You're teeing into the cold water supply under the kitchen sink, running a pipe through the wall, and fitting a tap on the other side. The whole job takes a couple of hours and the result is a permanent, properly plumbed garden tap — not a clip-on hose connector that falls off every time someone looks at it.
Planning: Where to Put It
The easiest position is directly behind the kitchen sink on the outside wall. Your cold water supply is already right there under the sink, which means the shortest possible pipe run through the wall. Less pipe means less work, fewer joints, and less chance of anything going wrong.
Three things to check before you drill
- Which pipe is the cold mains? Under the kitchen sink you'll usually have the cold mains supply (unsoftened water direct from the street) and possibly a separate softened cold supply if you have a water softener. Always tee into the unsoftened mains supply for the outside tap. There's no point paying for softened water to go on your garden.
- Is there anything in the wall? Use a cable and pipe detector before drilling. Cavity walls are generally straightforward, but solid brick walls can have cables run through them. Check both sides of the wall.
- Check valve requirement. Water regulations require a check valve (non-return valve) on any outside tap to prevent contaminated water from being siphoned back into the mains supply. Some taps have one built in — check before you buy. If yours doesn't, you need to fit a separate double check valve on the pipe run inside.
What You Need
Parts and tools
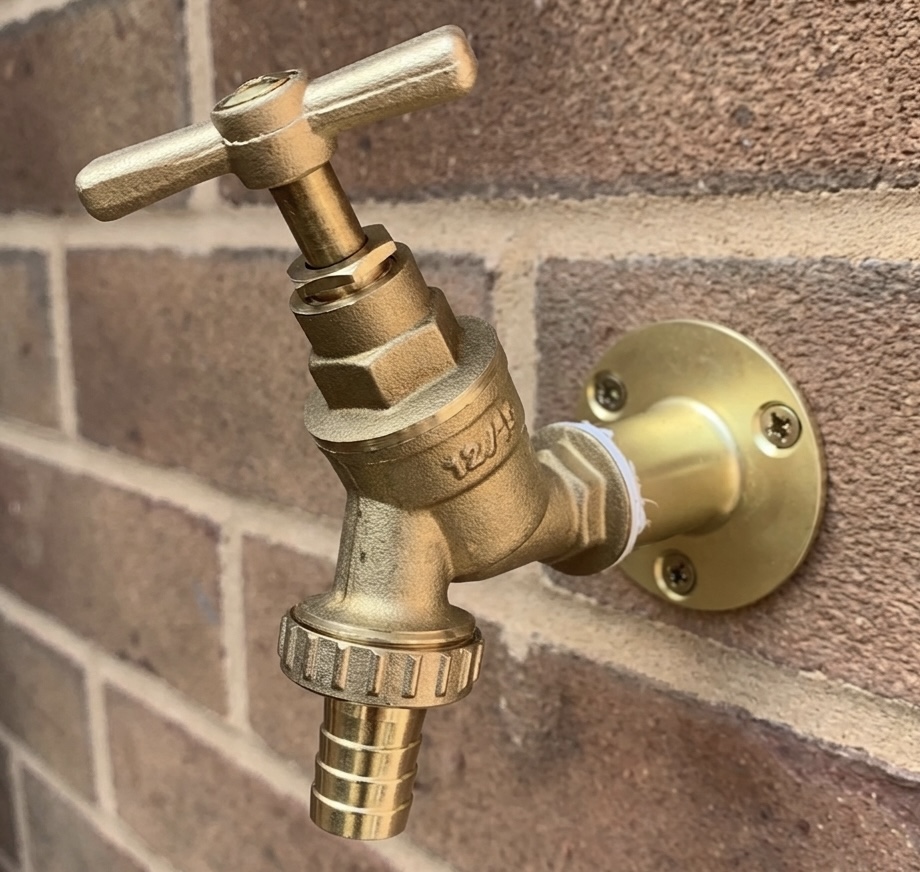
- Outside tap — either a wall-plate tap (with a mounting flange) or a through-wall tap kit (pipe passes straight through)
- Double check valve — if the tap doesn't have one built in. Must be WRAS approved
- Isolation valve (15mm) — to turn off the outside tap without shutting off the kitchen
- 15mm tee fitting — to branch off the cold supply
- 15mm copper pipe — enough for the run from tee to wall and through the wall
- 15mm elbow — to turn the pipe into the wall (may not be needed depending on your layout)
- Pipe clips
- Jointing compound or PTFE tape for threaded connections
- Silicone sealant — for sealing the hole on the outside wall
- SDS drill with long masonry bit (at least as long as the wall is thick — typically 250–300mm for a cavity wall)
- Soldering kit (blowtorch, flux, solder, heat mat) or compression fittings if you prefer not to solder
- Pipe cutter
- Wall plugs and screws for the tap mounting
Outside: Drill, Fit, and Seal the Tap
Drill through the wall
From the outside, drill through the wall at the position you've chosen. Angle the hole very slightly downward towards the outside — this ensures that if any condensation forms on the pipe inside the wall cavity, it drains outward rather than inward. A 20mm hole is enough for 15mm pipe.
Before you drill, put tape over the end of the pipe or stuff a rag in the hole once it's through to stop brick dust getting into the pipework.
Fit the tap
If you're using a through-wall kit, push the pipe through the hole from inside, and the tap body screws or connects onto the pipe on the outside. If you're using a wall-plate tap, you'll need a short piece of pipe through the wall with an elbow and a short vertical piece up to the tap plate.
- Push the pipe through the wall.
- Hold the tap body against the wall, mark the screw holes.
- Drill and plug the screw holes.
- Apply thread sealant (jointing compound works better than PTFE here because it also acts as a locking agent, keeping the tap from loosening on the thread over time).
- Screw the tap onto the pipe thread, then screw the mounting to the wall.
- Make sure the tap is turned off.
Seal the hole
Run a bead of silicone sealant around the pipe where it enters the wall. This stops rainwater tracking along the pipe and getting into the cavity. Smooth it off and make sure there are no gaps. Do the same on the inside if there's any visible gap around the pipe.
Inside: Tee into the Cold Supply
This is where the plumbing happens. You're cutting into the cold mains pipe under the kitchen sink and adding a tee to branch off a new feed for the outside tap.
The pipe run (from the cold supply to the wall)
Your pipe run should include these components, in this order from the tee:
- Tee fitting — branching off the cold mains supply
- Isolation valve — so you can turn off the outside tap independently without shutting off the kitchen cold
- Double check valve — with the arrow pointing in the direction of flow (towards the outside tap). This is a legal requirement, not optional
- Pipe run to the wall — and through the wall to the tap
Check valve direction
Every check valve has an arrow on the body showing the direction of flow. Water should flow through the arrow towards the outside tap. If you fit it backwards, water will flow out to the tap fine, but the check valve won't prevent backflow — which defeats the entire purpose of having one. Check the arrow before you solder or tighten.
Making the connections
- Turn off the cold mains at the stopcock. Open the kitchen cold tap to drain residual pressure.
- Cut out a small section of the cold pipe (slightly smaller than the tee body width) using a pipe cutter.
- Dry the pipe ends as much as possible — residual water in the pipe makes soldering difficult. Have a towel ready.
- Clean and flux the pipe ends and the inside of the tee fitting.
- Assemble the tee onto the pipe. Push the cold supply pipe into both ends and make sure everything is aligned.
- Solder the tee joints, plus any elbows and the pipe run up to the wall. If you're not confident with soldering, compression fittings work perfectly well here — just use jointing compound on the olives.
- Connect the isolation valve and check valve. These are usually compression fittings, so no soldering needed — just tighten with spanners.
- Clip the pipe neatly to the wall.
Drain the pipe before soldering
If there's water sitting in the cold pipe, solder won't take. You can try stuffing a small piece of bread into the open pipe end — it absorbs the residual water and dissolves when the mains is turned back on. Old plumber's trick, still works. Or just be patient, towel out as much as you can, and give it a few minutes to dry.
Test and Check for Leaks
- Make sure the outside tap is turned off.
- Make sure the isolation valve is open.
- Turn the mains water back on at the stopcock.
- Check every joint inside for leaks — the tee, the isolation valve, the check valve, every solder joint, every compression fitting. Run your fingers around each one.
- Go outside and turn the tap on. Let it run for 30 seconds to flush any flux residue or debris out of the pipe.
- Turn the tap off and check the inside joints again under static pressure.
- Go back outside and check around the wall plate and silicone seal.
If everything is dry, you're done. Clip the pipe tidy, clean up any flux residue, and the job is finished.
Winter: How to Avoid a Frozen Pipe
An outside tap is exposed to the elements. In Cambridgeshire, winter temperatures regularly drop below freezing, and water sitting in an exposed pipe will freeze, expand, and crack the pipe or the tap body. This is the most common reason for outside tap callouts in January and February.
How to winterise your outside tap
- Turn off the isolation valve inside — this is why you fitted one. Close it as soon as you stop using the tap for the season (usually October/November).
- Open the outside tap — with the isolation valve closed, open the tap outside to drain any water left in the pipe between the valve and the tap. Leave it open over winter so any residual water can expand without cracking anything.
- Disconnect the hose — a hose left connected traps water in the tap body. Remove it and store it inside.
- Insulate the pipe — if any pipe is exposed inside the cavity or in an unheated space, wrap it with pipe lagging. The section through the wall is the most vulnerable.
If you don't want to worry about winterising, you can fit a frost-proof outside tap instead. These have a long spindle that extends back through the wall, with the actual valve seat inside the warm building. When you turn off a frost-proof tap, the water drains from the exposed section automatically. They cost a bit more but are worth it if you forget to isolate every year.