How to Add Inhibitor to a Central Heating System
Corrosion inhibitor is the single cheapest thing you can do to protect your heating system. Without it, the water inside your radiators slowly corrodes the steel, producing black sludge (magnetite) and hydrogen gas that cause airlocks, pressure drops, cold spots, and eventually pump and boiler failures. A £10 bottle of inhibitor prevents all of it. Here's how to get it into the system without draining anything.
Why Your Heating System Needs Inhibitor
A heating system is a closed circuit of water, steel radiators, copper pipes, and a cast iron or aluminium boiler heat exchanger. Without chemical protection, the water reacts with these metals and causes three problems:
- Magnetite sludge. Black iron oxide that settles at the bottom of radiators, causing cold spots at the base while the top stays hot. Over time it builds up enough to block pipes, seize pump impellers, and clog heat exchangers.
- Hydrogen gas. A byproduct of the corrosion reaction. It rises to the top of radiators (you bleed it out and think it's air, but it's actually hydrogen) and can accumulate in the automatic air vent, causing pressure drops.
- Pin hole leaks. Long-term corrosion can eat through radiator walls and pipe fittings from the inside out.
Inhibitor is a chemical additive that coats the internal surfaces of the system, preventing the water from reacting with the metal. One dose protects the system for years. It's the difference between a heating system that runs trouble-free for 20 years and one that needs a power flush after 5.
Which Inhibitor to Use
The two industry-standard products are Fernox F1 Protector and Sentinel X100 Inhibitor. Both do the same job. Both are widely available. Either one is fine — pick whichever your local plumbing supplier stocks.
One bottle per system
A standard 500ml bottle treats a typical domestic heating system (up to about 100 litres / 10–12 radiators). If you have a large system with 15+ radiators, use two bottles. The bottle will have dosage instructions on the label — follow them. More is not better — over-dosing doesn't help and wastes money.
The Radiator Method (No Drain-Down Needed)
You don't need to drain the whole system to add inhibitor. You can do it through a single radiator by draining enough water out of that radiator to make room for the inhibitor, then pouring it in through the bleed valve hole. Here's the full process:
Step 1: Isolate one radiator
Pick a radiator that's easy to access — ideally on the ground floor where you can comfortably work at the valves. Close both valves:
- The TRV or manual valve at one end — turn it fully clockwise
- The lock shield at the other end — remove the cap and turn the spindle fully clockwise with an adjustable spanner
The radiator is now isolated from the rest of the system.
Step 2: Remove some water from the radiator
You need to make room inside the radiator for the inhibitor — roughly 500ml. The cleanest way to do this is with a large syringe and a length of narrow tubing:
- Remove the bleed valve entirely using your bleed key. Have a cloth ready — a small amount of water will dribble out.
- Push a length of narrow flexible tubing (5–8mm) through the bleed hole and down into the radiator. You want the end of the tube sitting in the water inside.
- Attach a large syringe (60ml or 100ml) to the other end of the tube. Draw out the water syringe by syringe into a container. Five or six pulls of a 100ml syringe gives you exactly 500ml — precise and controlled.
This method avoids undoing any valve nuts, avoids mess, and gives you exact control over how much you remove. No towels on the floor, no loosening compression fittings, no risk of not being able to retighten a seized nut.
Where to get a large syringe
Large syringes (60ml or 100ml) without needles are available cheaply from plumbing suppliers, pet shops (sold for feeding), or online. They're reusable — rinse it out and keep it in your toolbox. Once you've used this method, you won't go back to loosening valve nuts.
Alternative: loosen the valve nut
If you don't have a syringe, you can drain water by loosening the compression nut between the valve and the radiator insert (the nut on the radiator side of the valve, not the pipe side). Open the bleed valve at the top to let air in, and water will drain from the loosened nut at the bottom into a container. Let out roughly 500ml, then tighten the nut back up. This works but is messier and harder to control than the syringe method.
Step 3: Pour in the inhibitor
Now you need to get the inhibitor into the radiator through the bleed valve hole. There are two ways:
Method A: Funnel and tube
Remove the bleed valve entirely (unscrew it with the bleed key). Push a short length of narrow tubing into the hole and use a small funnel to pour the inhibitor in. The tubing stops it splashing everywhere. You need the nut at the other end of the radiator loosened slightly (or the bleed valve at the other end open) to let air escape as the liquid goes in — otherwise it'll glug and overflow.
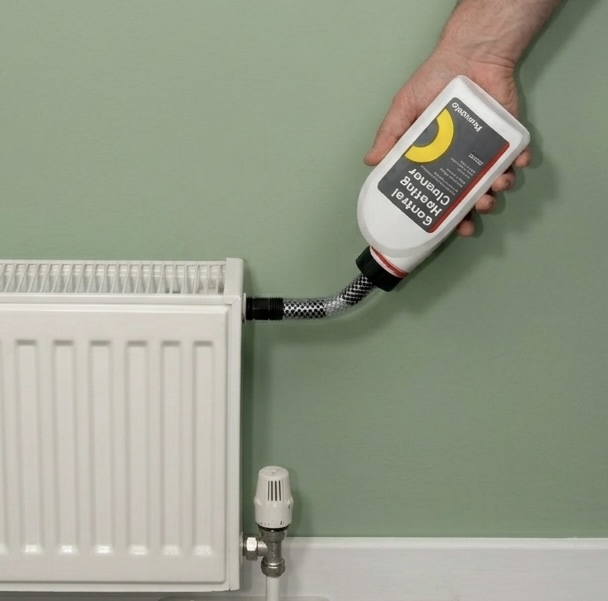
Method B: Inhibitor injection adapter
You can buy cheap radiator inhibitor adapters that screw into the bleed valve hole and have a push-fit hose connector on top. Screw it in, connect the bottle, and the inhibitor pours in by gravity. Same principle — you still need to let air escape from the other end.
Let air escape from the other end
If you're pouring liquid in one end of a sealed radiator, air needs to escape from the other end. Loosen the bleed valve or the nut at the opposite end of the radiator from where you're pouring. If you don't, the trapped air will push the inhibitor back out of the hole as fast as you pour it in.
Step 4: Close everything up and refill
- Once all the inhibitor is in, refit the bleed valve (or remove the adapter) and tighten it.
- Close any loosened nuts or bleed valves at the other end.
- Open both radiator valves — TRV and lock shield — to reconnect the radiator to the system.
- Bleed the radiator from the bleed valve to release the air you let in during the process.
- Pressurised systems: check the boiler pressure gauge. It may have dropped slightly from the water you drained. Top up via the filling loop to 1–1.5 bar if needed.
- Gravity systems (F&E tank): the tank in the loft will refill the system automatically. Listen for the ball valve running and wait for it to stop.
Step 5: Circulate
Turn the heating on and let it run for at least an hour. The pump circulates the inhibited water around the entire system, coating all the internal surfaces. The inhibitor will reach every radiator, the boiler, and all the pipework within a single heating cycle.
After Adding Inhibitor
That's it. The system is now protected. There's nothing more to do. The inhibitor stays in the water indefinitely as long as you don't drain the system. If you do drain for repairs, top up the inhibitor when you refill — you'll have diluted or flushed out the original dose.
Some plumbers test the inhibitor concentration during an annual boiler service using a test kit (Fernox and Sentinel both make them). If the concentration has dropped, they top it up. This is good practice but not strictly necessary on a system that hasn't been drained or topped up significantly.
When to Add Inhibitor
- After any drain-down and refill. Fresh water without inhibitor starts corroding the system immediately. Every time you drain and refill — for a radiator swap, valve change, or any pipework modification — add a fresh dose.
- If you're bleeding radiators frequently. If you're bleeding air (or more likely hydrogen) from radiators every few weeks, the system probably doesn't have enough inhibitor. The gas is a byproduct of internal corrosion. Adding inhibitor slows the corrosion and reduces the gas production.
- If the system has never had inhibitor. Older systems that were installed without inhibitor and have never been treated are ticking time bombs. The sludge may already be significant. Ideally, get a power flush to clear the sludge first, then add inhibitor to the clean system. If a power flush isn't practical right now, adding inhibitor anyway is still better than nothing — it won't remove existing sludge, but it will slow further corrosion.
- As part of an annual boiler service. Ask your heating engineer to check the inhibitor level during the annual service. A quick top-up takes five minutes and extends the life of the whole system.