6 Soldering Mistakes That Cause Leaks on Copper Pipe
Soldering copper pipe isn't difficult once you understand the fundamentals. But get any one of six things wrong and you'll end up with a joint that leaks — either immediately or, worse, months later when it's buried under floorboards or behind a wall. Here are the six mistakes and how to avoid every one of them.
Mistake 1: Not Cleaning the Pipe
Copper pipe that's been sitting in a box, under a floor, or on a shelf looks clean enough. It's shiny, it's copper-coloured, what's to clean? But the surface has a thin layer of oxidation and grime that you can't always see. Solder needs direct contact with bright, clean copper to bond properly. If there's oxidation, dirt, or grease between the solder and the copper, the joint will look fine from the outside but won't have a proper seal on the inside.
How to clean it
Use emery cloth or wire wool. Wrap it around the end of the pipe and rub until the copper is bright and shiny — you'll see the difference immediately. Clean about 25mm back from the end (the depth that goes into the fitting). It takes 10 seconds and is the single most important step in getting a watertight solder joint.
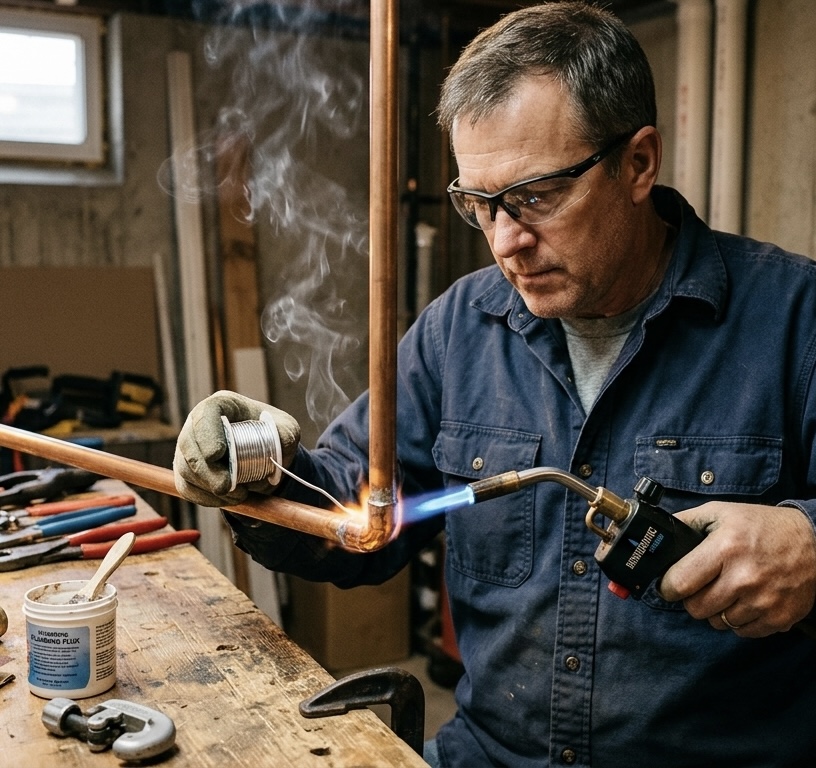
Mistake 2: Not Using Flux
Flux is an acid paste that does two critical jobs. First, it chemically cleans the copper surface even further, removing the last traces of oxidation. Second, when heated, it helps the solder flow into the joint by reducing surface tension — the solder gets drawn into the gap between pipe and fitting by capillary action. Without flux, the solder sits on the surface instead of flowing into the joint.
How to apply it
Apply a thin, even coat of flux to the outside of the pipe end only. Don't put flux inside the fitting and don't put it inside the pipe. Flux is an acid — any that stays inside the pipework after soldering can corrode the copper from the inside over years, eventually causing pin hole leaks. On the outside of the pipe, the heat of soldering burns the flux off completely, so it's not a problem.
Push the pipe into the fitting and give it a twist to spread the flux evenly around the joint. If there's excess flux squeezed out around the fitting, wipe it off before you light the torch.
Always use water-soluble flux
Old-style non-soluble flux was the main cause of internal pipe corrosion and pin hole leaks in older properties. Modern water-soluble flux (like Powerflow or equivalent) dissolves in water and doesn't leave aggressive residue inside the pipe. If you're buying flux, check the label says "water-soluble". It's the same price and eliminates a major long-term risk.
Don't flux and forget
Once flux is applied, solder the joint the same day. If you flux a pipe and leave it overnight, the flux dries out and goes crusty. It won't work properly the next day. Flux it, assemble it, solder it — in one go.
Mistake 3: Not Cleaning Inside the Fitting
Most people clean the pipe but forget the fitting. The inside of a copper fitting needs to be clean too — that's where the solder is going to bond. If you're using brand-new fittings straight from the packet, they're usually clean enough. But if you're reusing a fitting, or it's been sitting in a toolbox for months, give the inside a clean with a fitting brush or a strip of emery cloth wound around a screwdriver.
The pipe is clean, the flux is on, and the fitting is clean — now you're ready to solder.
Mistake 4: Too Much Heat
This is the most common mistake for beginners. You light the blowtorch, turn it up to full, and blast the fitting with as much heat as possible because you want to get it done quickly. The fitting turns blue, the flux burns off before the solder gets anywhere near it, and the copper is structurally weakened.
When copper overheats, it changes colour — from bright copper to a dull reddish-brown, then to a purple-blue. If you see blue on the fitting, you've gone too far. The metal has been weakened at a molecular level. It might hold for now, but over time, especially with thermal expansion and contraction, it's more likely to develop a crack or leak.
The right amount of heat
For 15mm pipe (the most common domestic size), use a medium flame. You should be able to hold the torch about 30–40mm from the fitting. Heat the fitting evenly — not just one spot — by moving the flame around it. The copper should change colour to a slightly darker shade but never go blue. When you touch solder to the joint and it melts and flows in immediately, the temperature is right.
Heat the fitting, not the pipe
The fitting needs to be hot enough to melt the solder. The pipe is thinner and heats up much faster — if you aim the flame at the pipe, you'll overheat the pipe before the fitting is ready. Aim at the fitting body and let the heat conduct into the pipe naturally.
Mistake 5: Too Little Heat
The opposite problem, usually caused by fear of the blowtorch. The flame is turned down too low, or held too far away, and the fitting never reaches soldering temperature. You touch the solder to the joint and nothing happens — it just sits there. Or it melts a little on the surface but doesn't flow into the joint.
If the solder doesn't flow instantly when you touch it to the joint, the fitting isn't hot enough. Don't force it by holding the solder in the flame — that melts the solder but doesn't draw it into the joint. Pull the solder away, heat the fitting for another 10–15 seconds, and try again.
On larger pipe sizes (22mm, 28mm), you need significantly more heat. A small hobby torch might not cut it. If you're regularly soldering 22mm or above, a proper plumber's blowtorch with a larger burner makes the job much easier.
Mistake 6: Trying to Solder with Water in the Pipe
This is the one that catches even experienced plumbers. You've cut into a pipe, turned the water off, but there's still a slow drip running down from higher up in the system. Or the pipe is horizontal and there's standing water inside. You try to solder, but the water absorbs the heat faster than the torch can deliver it. The fitting never reaches temperature and the solder won't flow.
Even a tiny amount of water — a drip every few seconds — is enough to prevent a good solder joint. The water turns to steam inside the fitting, which creates bubbles in the solder and prevents proper bonding.
How to deal with it
- Drain as much as possible. Open taps above and below the work area. Give the system time to drain. The more water you remove, the easier the solder.
- The bread trick. Tear off a small piece of white bread (no crusts), chew it slightly to compress it, and push it into the open pipe end with a pencil. The bread acts as a temporary dam, absorbing the residual water and giving you a few minutes to solder. Once the water is back on, the bread dissolves and flushes away harmlessly. This is an old plumber's trick that genuinely works.
- Use a second torch. If you have two blowtorches, use one upstream of the joint to flash the dripping water into steam before it reaches your fitting. The second torch heats the actual joint. This only works if you have a helper or can position the second torch safely.
- Use a compression fitting instead. If you can't stop the water and the bread trick isn't practical, switch to a compression fitting. Compression fittings don't care about water in the pipe — they seal mechanically. Sometimes the right tool for the job isn't the one you started with.
How much solder to use
For a 15mm fitting, you need roughly 25mm of solder wire. An easy way to measure if you're starting out: mark your solder wire every 5mm with a pen. Count five marks and that's your target for a 15mm joint. For 22mm, use about 40mm. Too little and you'll have gaps in the seal. Too much and you get ugly drips hanging off the bottom of the fitting — harmless but looks terrible.
Summary: The Right Order
- Clean the outside of the pipe with emery cloth until it's bright
- Clean inside the fitting (if reused or old)
- Apply water-soluble flux to the outside of the pipe only
- Push the pipe into the fitting and twist to spread the flux
- Wipe off any excess flux around the joint
- Heat the fitting (not the pipe) with a medium flame — keep it moving
- Touch solder to the top of the joint — when it melts and gets drawn in, you're done
- Remove the heat, let it cool naturally — don't quench with water
- Wipe the joint with a damp cloth while still warm to clean off flux residue
Get those nine steps right and every solder joint you make will be watertight. Miss any one of them and you're rolling the dice.