How to Remove and Refit a Radiator for Decorating
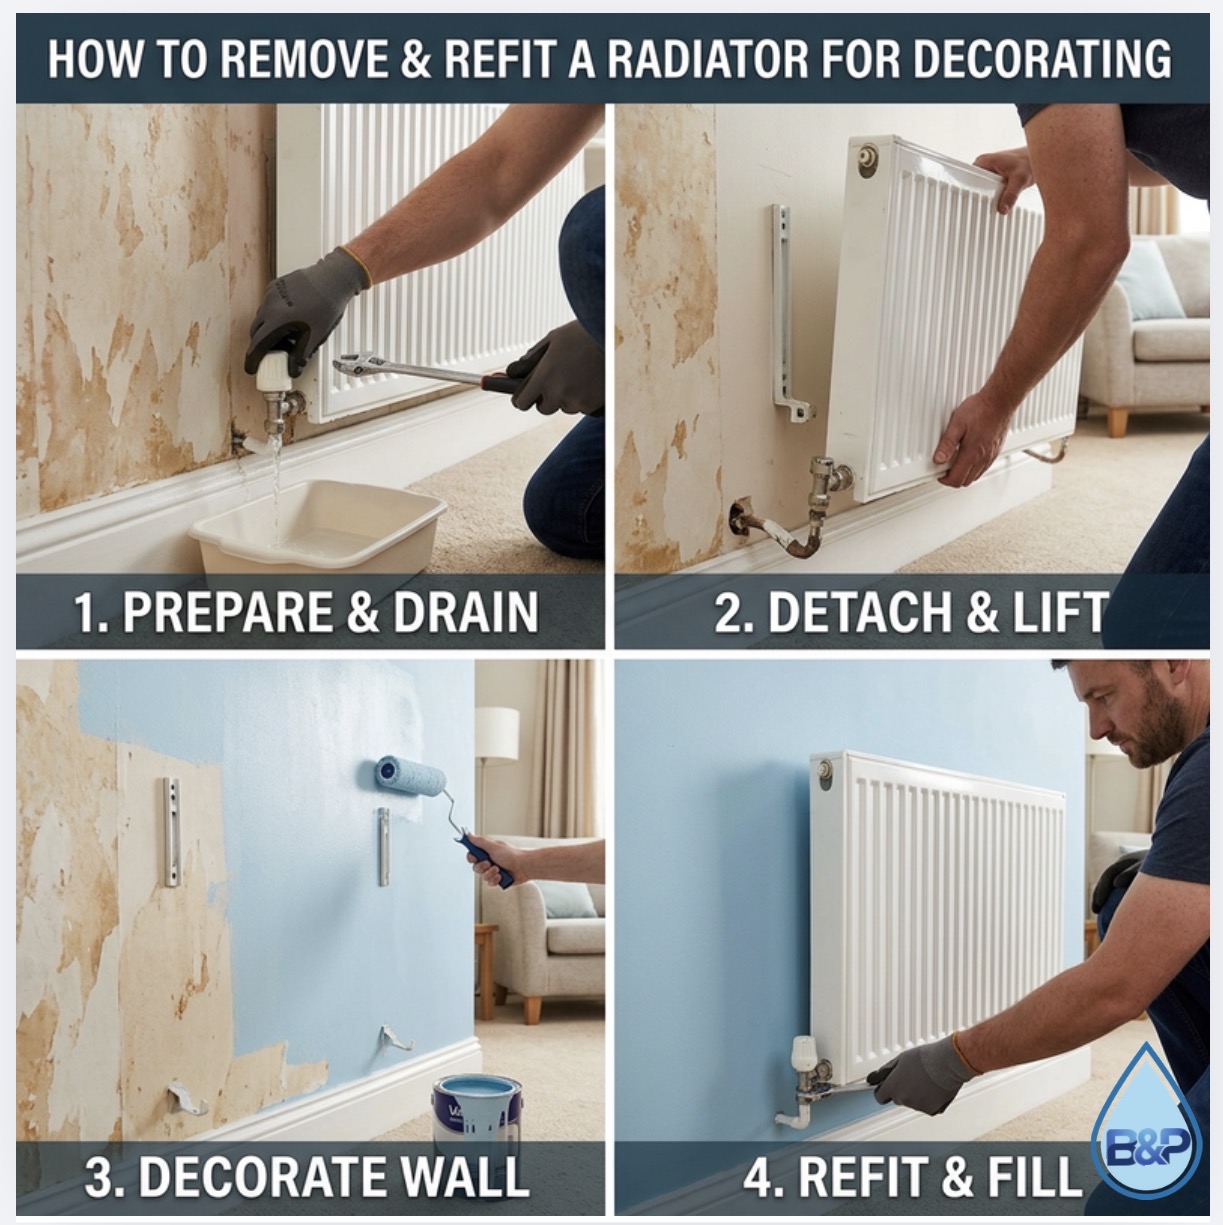
You can't get a roller behind a radiator. Everyone knows this, and everyone paints around it or sticks a long-handled radiator roller behind it and hopes for the best. The proper way is to take the radiator off the wall, paint, and put it back on. It sounds like a big job but it genuinely takes about five minutes each way. You don't need to drain the heating system, and the rest of the house stays warm while you do it.
Before You Start
What you need
- Adjustable spanner
- Plumbing grips
- Radiator bleed key
- Old towels (not the good ones)
- A shallow container — a plumber's tub, paint tray, or baking tray that fits under the valve against the wall
- A bucket for the water
Pressurised systems (combi boilers): before you start, check the pressure gauge on the boiler and note the reading (usually 1–1.5 bar). You'll need to top it back up after refitting. Take a photo if it helps.
Gravity-fed systems (tank in the loft): you don't need to worry about pressure. The system tops itself up automatically from the header tank.
Isolate the Radiator
You're closing both valves so this radiator is cut off from the rest of the heating system. The rest of the house stays warm — you're only working on this one radiator.
Close the TRV (or manual valve)
Turn the TRV dial fully clockwise until it stops. On most TRVs that's past the frost symbol to the off position.
Close the lock shield valve
Remove the plastic cap from the lock shield at the other end. Use an adjustable spanner on the spindle and turn it clockwise.
Count the turns
As you close the lock shield, count the number of full turns until it stops. Write it down. When you refit the radiator, you need to open the lock shield the same number of turns to keep the system balanced. If you don't, other radiators in the house may run hotter or cooler than before. Two turns is typical, but it varies.
Drain the Radiator
Both valves are closed. The radiator is isolated. But it's still full of water — you need to drain it before you can lift it off.
- Bleed the pressure. Open the bleed valve at the top of the radiator with your bleed key. Have a cloth underneath. Water will trickle out briefly, then stop once the pressure has equalised. Make sure the bleed valve hole points away from the wall — dirty radiator water on a freshly painted wall is not what you're after.
- Lay towels under the valve you're going to undo. Place your shallow container tight against the wall under the valve.
- Undo one valve nut. Hold the valve body with your grips to stop it rotating, and use the adjustable spanner to undo the nut that connects the valve to the radiator (the nut on the radiator side, not the pipe side). Turn it anti-clockwise. Water will start draining into your container.
- Speed it up. Open the bleed valve at the top again to let air in. This breaks the vacuum and lets the water drain faster.
- Wait. A single-panel radiator takes 3–5 minutes to drain. A double-panel takes longer. Empty your container into the bucket when it fills.
- Once the flow stops, undo the nut at the other end the same way to release any water trapped on that side.
Lift It Off the Wall
With both valve nuts undone and the water drained, tilt the radiator up on its brackets to drain any remaining water from the bottom — there's always a bit hiding in there. Let it run into your container.
Now lift the radiator straight up off the wall brackets. It's heavier than you expect, even empty — a standard single-panel is around 10–15kg, a double-panel 20–30kg. Get someone to help if it's a long radiator.
Tip it upside down immediately once it's off the wall — this stops any remaining water dripping out of the valve holes onto the floor. Move it out of the room.
Cap the TRV while the radiator is off
A TRV that's turned to "off" can still open if the room gets cold enough. If the radiator is off the wall for a few hours (or overnight while paint dries), the TRV might open and water will drip from the valve onto the floor. Fit a decorator's cap (they come with new TRVs) or screw a half-inch blanking cap onto the valve outlet. This physically prevents any water escaping even if the TRV opens.
Decorate
With the radiator off, you've got full access to the wall. Clean the dust and cobwebs off the back of the wall (years of convection heat draws dust up behind radiators). Paint, wallpaper, whatever you need to do. Let it dry fully before refitting — a warm radiator against wet paint doesn't end well.
Refit the Radiator
- Bring the radiator back and lift it onto the wall brackets. Line up the valve connections with the pipes.
- Apply a thin smear of jointing compound to the olives on both valves. This helps them reseal — once an olive has been disconnected and reconnected, a little compound gives it the best chance of sealing first time.
- Hold each valve body with grips and tighten the nut back up with the adjustable spanner. Firm and snug — don't overtighten.
- Open the lock shield valve — turn it anti-clockwise the same number of turns you counted when closing it. This restores the system balance.
- Open the TRV — turn it back to your preferred temperature setting (usually 3).
- You'll hear water start flowing back into the radiator as soon as the valves are open.
Bleed and Repressurise
The radiator was full of air when you refitted it. That air needs to come out.
- Open the bleed valve with your radiator key. You'll hear air hissing out.
- Keep it open until the hissing stops and water starts to dribble out. Close the bleed valve.
- Feel the radiator — it should be warming up evenly from the bottom. If the top is still cold, bleed again.
Repressurise (pressurised systems only)
Check the boiler pressure gauge. It will have dropped because the radiator took water from the system when it refilled. If it's below the reading you noted before starting (usually below 1 bar), top it up using the filling loop under the boiler. Open the filling loop valve slowly until the gauge reads 1–1.5 bar, then close it. See our boiler pressure guide for details.
Check for leaks
Run your fingers around both valve nuts. If either is damp, nip the nut up a quarter-turn. Wipe dry and check again after 10 minutes. If jointing compound is on the olive, leaks from refitting are rare.
Consider topping up inhibitor
Every time you open and drain part of the heating system, you lose a small amount of corrosion inhibitor. One radiator removal won't make a huge difference, but if you're doing multiple radiators across the house, it's worth adding a top-up dose once you're finished.