How to Plumb a Kitchen Sink Waste and Trap
Opening a kitchen sink waste kit for the first time is genuinely intimidating. You tip the box out and there are dozens of plastic pieces, rubber seals, nuts, compression rings, blanking caps, and a set of instructions that somehow make it less clear. The good news: you don't need to use all of it. Here's a logical order that turns the chaos into a working, leak-free waste system.
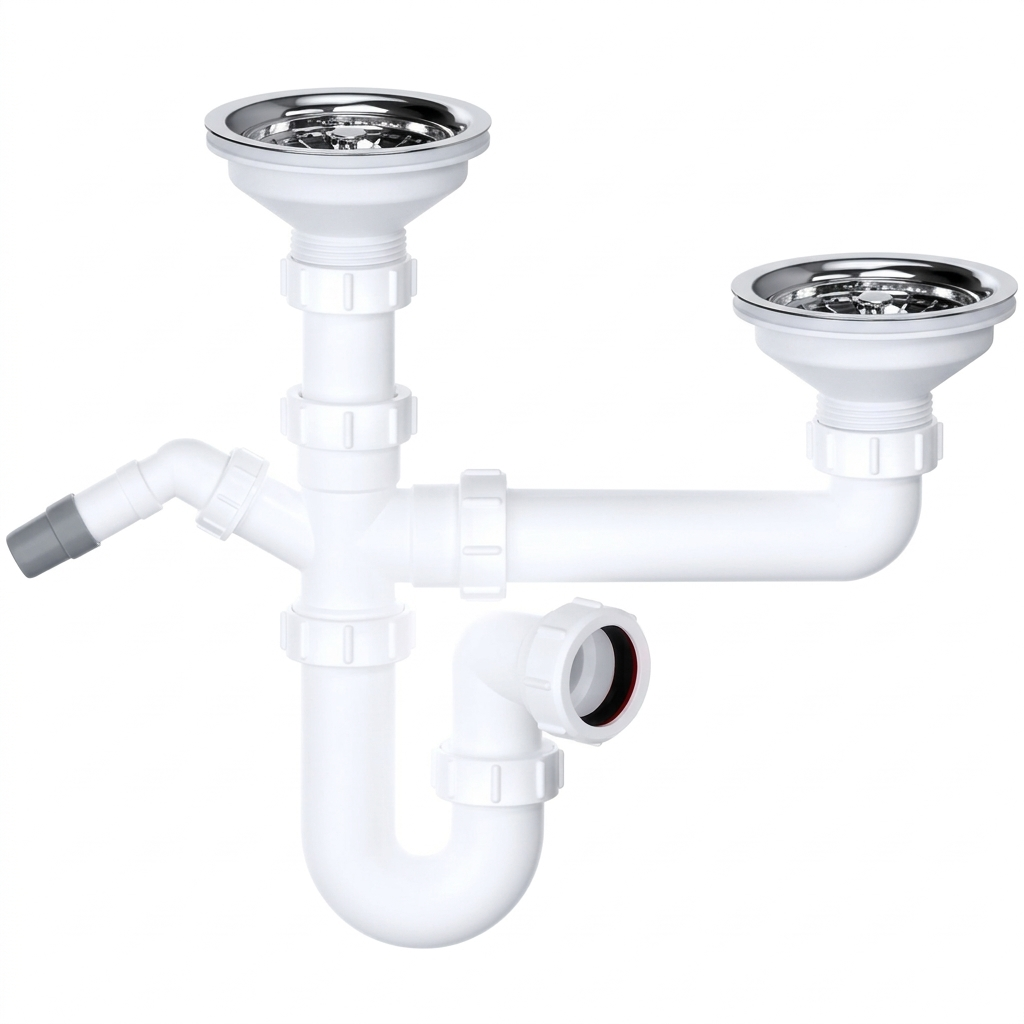
Overview: What Connects to What
Before you start assembling anything, understand the layout. A typical kitchen sink waste system has these components:
- Bowl waste(s) — the drain fitting in the bottom of each bowl, with a rubber seal, a clamp ring, and a tailpiece that points downward
- Overflow — a small pipe from the overflow hole in the bowl to the waste tailpiece, preventing the sink from flooding if you leave the tap running
- Down pipes — vertical pipes from each bowl waste running down to the manifold
- Trap — a U-bend that holds water to block sewer gases from coming back up through the sink. Sits below the manifold
- Manifold — a horizontal pipe with multiple inlets that collects all the down pipes (and the dishwasher waste) into one outlet
- Dishwasher spigot — a nozzle on the manifold for the dishwasher waste hose to push onto
- Outlet pipe — runs from the trap to the soil stack or waste pipe in the wall
You won't use everything in the box
Waste kits are designed to work with multiple sink configurations — single bowl, bowl and a half, double bowl, with or without dishwasher. The box contains parts for all possible setups. You'll use about half of what's in there. Don't panic about the leftover pieces — bag them up and keep them in case you need spares later.
Step 1: Fit the Bowl Wastes
Start at the top and work down. Fit the waste fittings into each bowl of the sink before you do anything underneath.
- Each bowl waste has a flange (the visible chrome or stainless ring from above), a rubber gasket that goes underneath the sink, and a clamp or locking nut that tightens from below.
- Drop the flange into the waste hole from above. From underneath, place the rubber gasket against the underside of the sink, then thread on the clamp ring or screw.
- Tighten using a large flat-head screwdriver from above while holding the clamp from below. Get it firm — the rubber gasket needs to compress enough to seal, but don't overtighten and crack the sink.
- Point the tailpiece outlet towards the back of the cupboard where you want the pipework to run. Most waste fittings swivel, so you can adjust the direction even after tightening.
Step 2: Fit the Overflow
The overflow connects the overflow hole in the bowl to the waste tailpiece. It's usually a flexible hose or a rigid plastic piece with a compression fitting at each end.
- Check the overflow hole in the sink has been knocked out — some sinks come with the hole moulded but not fully open. Push it through from the front if needed.
- Fit the overflow plate on the inside of the bowl (decorative side facing you).
- Connect the hose from the back of the overflow plate to the overflow inlet on the waste tailpiece.
- Hand-tighten the compression nuts. These are rubber-sealed plastic fittings — hand-tight is enough. No spanners needed.
Step 3: Build the Trap
The trap is the U-shaped piece that sits at the lowest point of the waste system. It holds water permanently, creating a seal that stops sewer gas from coming back up through the plughole. Build the trap on the worktop first, then fit it in position.
Most kitchen traps are 1.5 inch (40mm) with compression connections. Assemble the trap body, making sure the rubber seals are seated properly in the compression nuts. The outlet of the trap points towards the wall where the soil pipe connection is.
Step 4: Build the Manifold
The manifold is the horizontal pipe that collects all your waste sources into one outlet. It typically has three or four inlets — one for each bowl, one for the dishwasher, and sometimes a spare.
Work out what you need
Before assembling, look at your sink and count the connections:
- One bowl = one inlet
- Bowl and a half = two inlets
- Dishwasher = one inlet (the spigot connection)
- Any unused inlets = blank them off with the blanking caps provided
Assemble the manifold with the inlets pointing upward, the blanking caps on unused ports, and the dishwasher spigot on the correct port. The manifold outlet connects to the top of the trap.
Keep the spare parts
The blanking caps, spare compression nuts, O-rings, and unused spigots — bag them up and keep them in the cupboard. If you add a dishwasher later, or need to reconfigure the waste, you'll have the parts ready. Saves a trip to the plumbing supplier for a 50p blanking cap.
Step 5: Connect the Down Pipes
Now connect the bowl waste tailpieces to the manifold inlets using the down pipes. These are the vertical pipes that run from each bowl waste to the manifold below.
- Hold the manifold in roughly the position it'll sit (you might need someone to hold it while you measure).
- Mark where each down pipe needs to be cut to reach from the bowl waste tailpiece to the manifold inlet.
- Cut with a pipe cutter or hacksaw. Cut square and clean — a rough cut won't seal properly in the compression fitting.
- Fit a compression nut and sealing ring onto each cut end before pushing into the manifold.
- Hand-tighten all connections.
Try to keep the down pipes as vertical as possible and the manifold level. A manifold that tilts means water pools on one side and drains slowly from the other.
Step 6: Run to the Soil Stack
The trap outlet needs to connect to the waste pipe in the wall (the soil stack or a branch pipe). This is usually a 1.5 inch (40mm) push-fit or solvent-weld connection.
- Measure from the trap outlet to the soil pipe entry in the wall.
- Cut a piece of waste pipe to length.
- If it's a push-fit system, just push the pipe into the fitting in the wall — the rubber seal inside does the rest.
- If it's solvent-weld, apply solvent cement to both the pipe and the fitting, push together, and give it a quarter-turn to spread the cement. Hold for 10 seconds. Don't run water through it for at least 15 minutes while the cement sets.
Make sure the pipe has a slight fall towards the wall — waste water needs to drain by gravity. A flat or uphill run will cause slow drainage and eventually blockages.
Clip the pipe to the wall
A waste pipe that's not clipped will sag over time as it fills with water, creating a low point where food debris collects. One or two pipe clips on the horizontal run keeps it straight and falling correctly. Drill, plug, and clip — takes two minutes and prevents years of slow-draining problems.
Step 7: Test for Leaks
Before you close the cupboard doors and declare victory:
- Go back through every connection and give each compression nut a final check — hand-tight plus a small nip. Don't use a wrench on plastic waste fittings — you'll crack them.
- Put the plugs in both bowls. Fill each bowl with water — about half full.
- Pull the plugs simultaneously. A large volume of water flowing through at once is the best way to reveal a leak.
- Get under the sink with a torch and watch every joint. Check the bowl waste seals, the overflow connections, the down pipe joints, the manifold ports, the trap, and the outlet.
- Run the dishwasher on a short cycle if it's connected. The dishwasher pumps water out at pressure, which can reveal leaks that gravity drainage doesn't.
If everything is dry, you're done. If you find a drip, tighten the leaking joint a fraction — or take it apart and check the rubber seal is seated properly.
Tips for a Clean Installation
- Keep it all at the back of the cupboard. Route pipework against the back wall, not across the middle of the under-sink space. Your customer (or you) needs to store cleaning products, bins, and other things under there. A waste system that fills the entire cupboard is poor workmanship.
- Keep the manifold level. A tilted manifold drains unevenly. Use a small spirit level if you can.
- Don't overtighten plastic fittings. They're hand-tight plus a small nip. Plastic threads strip easily and cracked nuts mean buying replacements.
- Rubber seals face the right way. The tapered rubber compression rings have a flat side and a tapered side. The taper faces into the fitting. Wrong way round and it won't seal.
- Leave the dishwasher spigot accessible. If you blank it off now, make sure you can reach it later to connect a dishwasher without dismantling the whole manifold.