How to Fix a Pin Hole Leak in Copper Pipe
A pin hole leak in a copper pipe is one of those problems that starts small and gets worse fast. A tiny spray of water today becomes a soaked ceiling tomorrow. This guide covers three ways to fix it — from a five-minute emergency patch to a permanent soldered repair — so you can pick the right fix for your situation.
First Thing: Turn the Water Off
Before you do anything, find the isolation valve or stopcock and shut the water off. If you're on a gravity-fed system (hot water cylinder in the airing cupboard, cold tank in the loft), you might also need to open a tap upstairs to let air in and stop the residual water pushing through.
If you can't find your stopcock, it's usually under the kitchen sink, in a utility cupboard, or where the mains pipe enters the house. Turn it clockwise to close. If it's seized and won't turn, don't force it — you'll snap it. That's a job for a plumber with a set of grips and experience not breaking things.
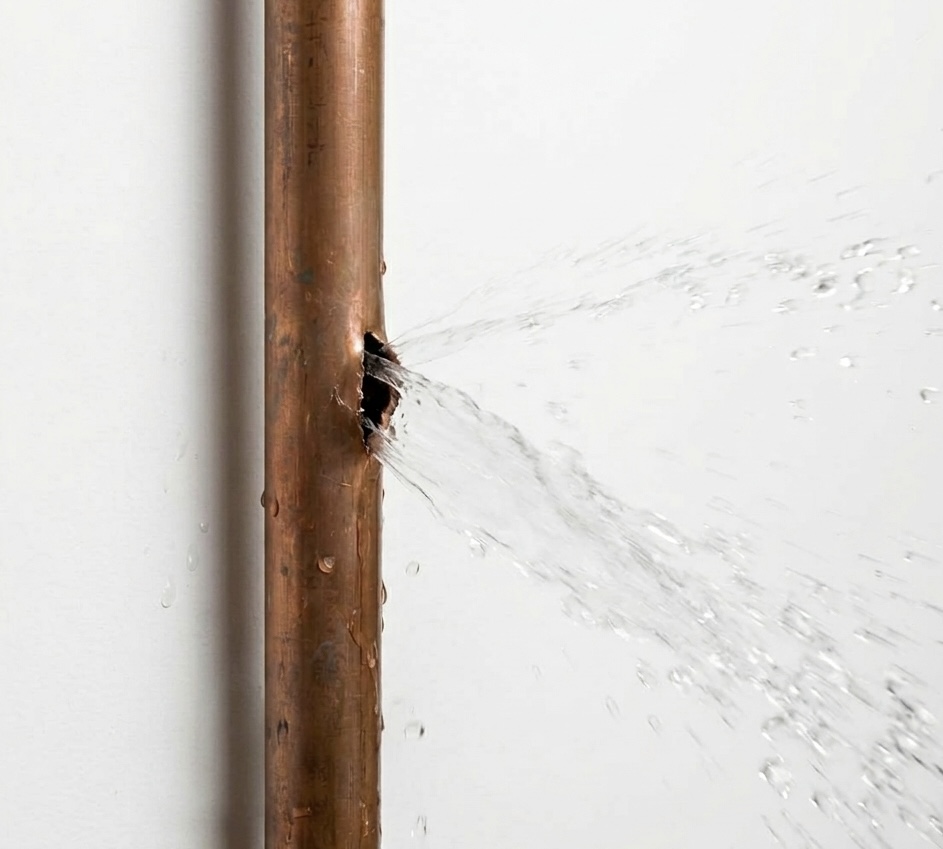
Why Do Pin Holes Happen?
Pin holes in copper pipe don't just appear randomly. There's almost always a reason, and understanding it matters because it tells you whether this is a one-off fix or the start of a bigger problem.
Common causes
- Flux residue inside the pipe. This is the most common cause. Years ago, before water-soluble flux became standard, plumbers would use aggressive flux that stayed inside the pipework. Over 20–30 years it eats through the copper from the inside out. If this is your issue, there could be more pin holes waiting to appear elsewhere in the system.
- Hard water and limescale erosion. Particularly common in Cambridgeshire where the water is hard. Mineral deposits can create localised corrosion points over time.
- Electrolytic corrosion. Where copper meets a dissimilar metal (like galvanised steel) without a proper dielectric fitting, one metal corrodes the other. You'll sometimes see this where old and new pipework has been joined.
- Water velocity erosion. Where pipes are undersized or have tight bends, fast-moving water can wear through copper at pressure points.
If you've got a single pin hole on an otherwise sound pipe run, a repair makes sense. If you're finding pin holes in multiple places, the pipe is corroded throughout and you're better off replacing the whole section. Patching it will just buy you time before the next one appears.
Method 1: Rubber and Jubilee Clip (Emergency Fix)
This is the "it's Friday evening, water is spraying everywhere, and I need to stop this right now" fix. It's not permanent. It's not pretty. But it works long enough to get you to the weekend or until a plumber can come back and do a proper repair.
What you need
- A small piece of rubber — a strip cut from a rubber glove, an old inner tube, a bit of rubber sheet, anything flexible and watertight
- A jubilee clip (hose clamp) sized to fit the pipe — 22mm pipe needs roughly a 20–32mm jubilee clip
- A flat-head screwdriver or 7mm socket to tighten it
How to do it
- Turn the water off.
- Dry the pipe around the pin hole as best you can.
- Press the rubber patch over the pin hole, holding it in place with your thumb.
- Slide the jubilee clip over the pipe and position it directly over the rubber.
- Tighten the jubilee clip until it's snug. Don't go mad — you want it firm, not crushing the pipe.
- Turn the water back on and check for drips.
This is a temporary fix
A jubilee clip and rubber patch works well on gravity-fed systems where the pressure is low. On mains pressure, it might hold, it might not. Either way, treat it as a stop-gap — not a permanent repair. Get it done properly within a few days.
Method 2: Cut and Compression Fitting (Proper Repair)
This is the next level up. You're cutting out the damaged section and replacing it with a compression fitting. No heat, no solder — just a fitting that compresses an olive onto the pipe to make a watertight seal. Most plumbers carry these in the van and it's a reliable, long-lasting repair.
What you need
- A pipe cutter or hacksaw
- A compression straight coupling (same diameter as the pipe — 15mm or 22mm)
- Two adjustable spanners or a spanner and a set of grips
- A towel or bucket to catch residual water
How to do it
- Turn the water off and let the pipe drain.
- Find the exact location of the pin hole. Place your pipe cutter blade or hacksaw directly over it and make your cut. You only need to cut once — you're cutting out the pin hole itself, not removing a section.
- Check you've got enough spring in the pipe to separate the two cut ends. You need enough movement to slip the fitting between them. Wiggle the pipe gently — if it moves a few millimetres either side, you've got enough.
- Slide a compression nut and olive onto each cut end of pipe.
- Spring the pipe apart, slide the fitting body between the two ends, and push it all back together.
- Hand-tighten both nuts onto the fitting body, then give each one a turn and a quarter with a spanner while holding the fitting body with the other spanner. Don't overtighten — the olive does the sealing, not brute force.
- Turn the water back on and check for leaks at both ends of the fitting.
Why not push-fit?
Push-fit fittings (like JG Speedfit) technically work here, but they need more pipe movement to get both ends inserted fully. On a fixed pipe run with minimal spring, you often can't get enough movement. Compression fittings are more forgiving in tight situations — they slide on from both ends and tighten in place.
Method 3: Cut and Solder (Permanent Fix)
This is the proper, permanent repair. A soldered joint is as strong as the pipe itself — it's not going anywhere. But it requires more skill, more tools, and the pipe must be completely dry and clean. If there's any water in the pipe, the solder won't take.
What you need
- A pipe cutter or hacksaw
- A solder ring (Yorkshire) fitting or an end-feed fitting with lead-free solder
- Flux — use water-soluble flux (like Powerflow). Older non-soluble fluxes are what caused the pin holes in the first place
- A blowtorch (butane or MAPP gas)
- Pipe cleaning brush or emery cloth
- A heat-resistant mat if working near timber or other flammable materials
How to do it
- Turn the water off and drain the pipe completely. Open taps above and below the work area. If there's any water left in the pipe, stuff a bit of bread into the open end — it absorbs the residual moisture and dissolves when the water comes back on. (Old plumber's trick.)
- Cut through the pipe at the pin hole, same as with the compression method.
- Clean the outside of both pipe ends with emery cloth or a pipe cleaning brush until the copper is bright and shiny. Do the same inside the fitting. This matters — solder won't bond to dirty or oxidised copper.
- Apply a thin layer of flux to the outside of the pipe ends. Don't overdo it — excess flux inside the pipe is exactly what causes pin holes in 20 years' time. Don't flux the inside of the fitting.
- Slide the fitting on and give it a twist to spread the flux evenly.
- Heat the fitting (not the pipe) from the bottom with your blowtorch. If you're using a solder ring fitting, you'll see solder appear as a ring around the edge when it's hot enough. If you're using end-feed, touch your solder wire to the top of the joint — if the fitting is hot enough, the solder will get drawn in by capillary action and flow all the way around.
- Remove the heat, let it cool for a minute, then wipe with a damp cloth to clean off flux residue.
- Turn the water back on and check the joint.
Fire risk
You're using an open flame near timber joists, insulation, and potentially electrical cables. Always use a heat-resistant mat behind the pipe. Keep a fire extinguisher or wet towel nearby. If the pipe is boxed in or against a timber wall, soldering might not be safe — use a compression fitting instead.
Which Method Should You Use?
Quick comparison
- Jubilee clip + rubber — Emergency only. No tools, no skill, buys you a few days. Works best on gravity-fed (low pressure) systems. Do not treat this as permanent.
- Compression fitting — Solid, long-lasting repair. No heat needed. Works in tight spaces. This is what most plumbers will reach for as a standard pin hole repair.
- Soldered fitting — Permanent. The strongest option. But the pipe must be bone dry, you need a torch, and you need to know how to solder. Not one to attempt if you've never soldered before.
If you're a homeowner dealing with a pin hole for the first time, the jubilee clip gets you through the night and a plumber will sort the rest. If you're comfortable with basic plumbing, a compression fitting is a perfectly good permanent repair that doesn't require soldering skills.
When to Replace the Whole Pipe
Fixing one pin hole is straightforward. But if you've had two or three in the same pipe run, or the copper is visibly green, pitted, or thin when you cut into it, the whole pipe is on its way out. Patching individual holes at that point is just chasing the problem down the pipe — another one will appear a few months later.
This is especially common in older Cambridgeshire properties where the original pipework is 30–40 years old and was installed with non-soluble flux. The corrosion is inside the pipe where you can't see it. If the copper crumbles or feels paper-thin when you cut it, that pipe needs replacing — not patching.
A full repipe of a section might sound like a bigger job, but it's cheaper than three callouts to patch individual holes. And it means you won't be back under the floorboards in six months doing the same thing again.
If you're not sure whether to patch or replace, we're happy to take a look and tell you straight. No point paying for a repair that won't last.