How to Desolder and Replace Copper Fittings
Sometimes a fitting needs to come off. Maybe the pipe run needs rerouting, maybe the fitting is leaking and can’t be saved, or maybe someone soldered an elbow where a straight was needed. Whatever the reason, you don’t need to cut the pipe — you can desolder the old fitting, clean up the pipe, and solder a new one in its place. It works on copper pipe of any age.
What You’ll Need
Tools and materials
- A decent blowtorch — not a cheap single-use lighter-style torch. You need consistent, controllable heat that gets hot quickly. A self-igniting MAP gas or propane torch with a proper flame control valve is ideal.
- Heatproof mat — essential if you’re working near timber, in a cupboard, against a wall, or anywhere you could scorch something. These cost a few pounds and prevent house fires. Non-negotiable.
- Two pairs of pliers or grips — one to hold the pipe, one to pull the fitting. Make sure the pair gripping the pipe you want to keep actually fits the pipe properly — if the jaws are too big, you’ll crush it.
- Wire wool — for cleaning old solder and oxidation off the pipe.
- Flux — use a cleaning flux for reused pipe. It’s more aggressive than standard flux and helps clean the copper surface for a good bond.
- Solder — lead-free solder for any work on water-carrying pipes (lead solder is illegal on potable water systems).
- The replacement fitting — whatever you need: straight coupler, elbow, tee, reducer.
- Cloth — for wiping flux residue after the joint cools.
Desoldering — Removing the Old Fitting
The principle is simple: heat the joint until the solder melts, then pull the fitting off while it’s liquid. In practice, it takes a bit of patience and the right approach.
- Place your heatproof mat behind the joint to protect anything behind it. If you’re working on a pipe in a floor void, against a joist, or inside a cupboard, this is not optional.
- Grip the pipe you want to keep with one pair of pliers. Grip the fitting (or the pipe you’re removing) with the other.
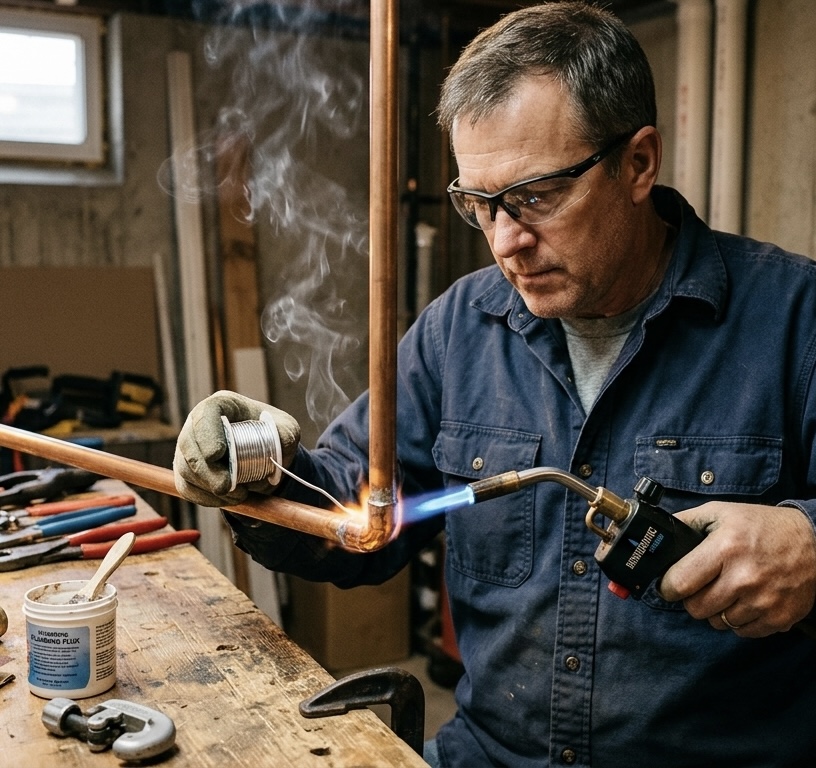
- Apply heat to the fitting. Aim the hottest part of the flame — the tip of the blue inner cone — at the fitting, not the pipe. You want the heat to conduct through the fitting and melt the solder inside the joint. Move the flame around the fitting to heat it evenly.
- Keep testing with a gentle twist. Every few seconds, give the fitting a slight twist or wiggle with your pliers. Don’t force it — if the solder hasn’t melted, you’ll just kink the pipe. When the solder melts, the fitting will suddenly go loose and slide off with almost no resistance.
- Pull the fitting off as soon as it releases. Set it down somewhere safe — it’s extremely hot.
It might not come off first time
If the fitting doesn’t release after 20–30 seconds of heat, stop, let it cool for a minute, and try again. Sometimes the solder needs two or three heat cycles before it fully melts, especially on older joints where the solder has had decades to oxidise. Don’t just keep the torch on indefinitely — the copper will start to anneal (soften) and you’ll end up with a floppy pipe.
Fire safety
A blowtorch flame is over 1,000°C. Timber joists, plasterboard paper, plastic pipes, insulation, and even dried paint can ignite from direct or reflected heat. Always have the heatproof mat in place, keep a fire extinguisher or damp cloth within arm’s reach, and check the area behind the joint 15 minutes after you finish. Smouldering timber doesn’t always show itself immediately.
Cleaning and Preparing the Pipe
Once the fitting is off, the pipe will have a ring of old solder and discolouration where the joint was. This is a chemical reaction between the flux, solder, and copper — it’s normal and it doesn’t mean the pipe is damaged.
- Let the pipe cool completely. Don’t quench it with water — rapid cooling can stress the copper and cause micro-cracks. Just leave it alone for a few minutes.
- Clean the pipe end with wire wool. Rub it around the pipe until you can see clean copper and feel no lumps or bumps. You don’t need to get back to shiny bare copper — just remove any raised solder blobs that would prevent the new fitting from sliding on.
- Test-fit the new fitting. Slide it on dry. It should push on smoothly with a slight friction fit. If it won’t go on, there’s still a solder lump in the way — more wire wool.
The discoloured ring on the pipe is cosmetic. As long as the surface is smooth enough for the new fitting to slide on and the flux to make contact, the joint will be as strong as any other.
Resoldering the New Fitting
- Apply cleaning flux around the prepared end of the pipe. A cleaning flux is recommended here rather than standard flux, because reused pipe has a thicker oxide layer than fresh-cut copper. The cleaning flux is more aggressive and ensures a good chemical bond.
- Slide the new fitting on and push it fully home until the pipe hits the internal stop.
- Apply heat from below. Aim the flame at the bottom of the fitting. Heat rises, so starting from the bottom creates a natural draw that pulls molten solder upwards into the joint through capillary action. This gives you a full, even seal around the entire circumference.
- Feed in solder. Touch the solder wire to the top of the joint (opposite side from the flame). When the fitting is hot enough, the solder will melt on contact and wick into the joint. You’ll see a bright ring of solder appear around the edge of the fitting. Once you see a complete ring, stop feeding — the joint is full.
If you’re using Yorkshire fittings (pre-soldered fittings with a solder ring built in), you don’t need to feed solder. Just apply heat evenly until you see the ring of solder appear around the edge — that means the internal ring has melted and filled the joint.
End-feed vs Yorkshire
Both work on reused pipe. Yorkshire fittings are easier for beginners because the solder quantity is pre-measured — you can’t over-feed or under-feed. End-feed fittings are cheaper and give you more control, but it takes practice to judge how much solder to add. For a full breakdown of common soldering mistakes, check our dedicated guide.
Cooling and Cleanup
Leave the joint to cool naturally. Do not:
- Quench it with water. Rapid cooling can cause thermal shock, leading to micro-cracks in the solder that may not leak immediately but will fail under pressure later.
- Wipe it with a wet cloth while hot. Same problem, plus you’ll scald your hand.
- Apply flux to a hot joint. The flux will burn off instantly without cleaning anything, and the fumes are unpleasant.
Once cool (give it at least five minutes), wipe off any flux residue with a damp cloth. Leftover flux is acidic and will corrode the copper over time if left on the surface, leaving green verdigris staining. Then clean the joint up with wire wool to remove any discolouration. This is cosmetic — it doesn’t affect the seal — but a clean joint looks professional and makes it easier to spot leaks during testing.
Test the joint under pressure. If you’re on a sealed heating system, repressurise and check. If you’re on mains water, open the isolation valve and check the joint for any signs of weeping. A properly soldered joint on prepared pipe will hold indefinitely — the solder and copper become one piece.
When to Cut Instead
Desoldering isn’t always the right approach. Sometimes cutting the pipe and starting fresh is faster and safer:
- Restricted access. If you can’t safely position a heatproof mat behind the joint, or there are plastic pipes, insulation, or timber too close to the flame, don’t risk it. Cut the pipe, use a push-fit coupler or a compression fitting to rejoin it without heat.
- Damaged pipe. If the pipe is already dented, kinked, or thinned by corrosion (common in older properties around Cambridgeshire where the water is hard), desoldering risks weakening it further. Better to cut back to clean copper and work from there.
- Multiple fittings in a tight cluster. Heating one fitting can melt the solder on adjacent fittings and cause them to loosen. If you’re working on a joint that’s close to other soldered connections, the heat will travel and you may end up with more problems than you started with.
- The pipe is still holding water. Even a small amount of water inside the pipe will absorb the heat and prevent the solder from reaching melting temperature. You’ll sit there with the torch on for ages and nothing will happen. The pipe needs to be fully drained and dry before desoldering will work. If you can’t get the water out, cut the pipe instead.
The bread trick
If there’s a small amount of residual water in the pipe that won’t drain (common in horizontal runs with no fall), push a ball of white bread into the pipe upstream of the joint. The bread absorbs the water and stops it from reaching the joint area while you solder. Once you turn the water back on, the bread dissolves and flushes through. It sounds odd, but it’s a standard plumber’s trick that’s been used for decades.